Tutorials
CADTutor tutorials are all original and specifically designed to get you working with AutoCAD and other applications as knowledgeably as possible. We don't believe in providing only quick step-by-step tutorials like other sites. Our tutorials are comprehensive and aim to give you a deeper understanding and a better learning experience. See the AutoCAD tutorials page for more information.
If you can't see what you're looking for on this page, take a look at the list of all tutorials and don't forget that there's lots more content in the Michael's Corner section of the site.
We're always on the lookout for good content. If you have a tutorial or an article that you'd like to see published on CADTutor, get in touch using the contact form.
Tutorials of the Moment
The most recently viewed tutorials
The UCS Icon |
AutoCAD to Bryce
|
|
Last visited: 1 minute ago |
Last visited: 1 minute ago |
|
AutoCAD 2010: The User Interface - Part 3
|
Dimensioning
|
|
Last visited: 2 minutes ago |
Last visited: 3 minutes ago |
Featured Tutorials
Tutorials we think you'll like
AutoCAD 2010: Starting a Command
|
AutoCAD 2010: Ribbon Basics
|
|
Last visited: 2 hours ago |
Last visited: 10 minutes ago |
|
AutoCAD 2010: The User Interface - Part 1
|
AutoCAD 2010: Getting Ready for 3D
|
|
Last visited: 10 minutes ago |
Last visited: 9 minutes ago |
Tip of the Day
Copy and Move without commands
 You can copy or move objects without using any commands!
To move an object select it once, then click and drag it (not the grips) to move it to wherever you want. Release the mouse button to drop it.
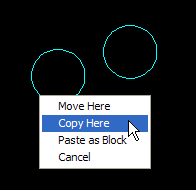
To copy an object, select it once, then right-click and drag it. When you release the mouse button, you are presented with a menu, allowing you to Move, Copy or Paste as Block.
Missed a Tip?
Did you miss yesterday's tip? Maybe you forgot to drop by or maybe you don't visit over the weekend. If so, you can now see all the tips published during the past week. Also, if you have a tip you'd like to share with us, you can post it on our forum and if we like it, we'll publish it here.
Local Navigation
Featured Tutorial
AutoCAD 2010: Joining Lines, Polylines and Arcs
This video tutorial demonstrates how to join lines, polylines and arcs using the Join command and the Edit Polyline command. Running time: 6min 49sec
Sponsored Links
The Basics
- Dual Dimensions in a Dim…
- UCSICON Options
- "Best of" Basics: Irreg…
- Tool Palette Basics
- Original Dimension Value
- Possible Solutions to th…
- Avoid Using 'Standard' i…
- Shorten the Plot Scales…
- Update the Source File B…
- User Increment Angles fo…
- Drawing Information
- 'Sign Language'
- Rotate with the Copy Opt…
- Use the INSERT Osnap on…
- To or From the Current L…


