
Cameras
Introduction
Cameras are the main viewing tools in 3D visualisation. They are placed in the scene either manually or from the Perspective viewport and named uniquely. Multiple cameras can exist in the scene, each one with separate views to show the client around the scene. They are also used extensively to aid modelling and to keep a tight hold on what needs modelling and at what detail. Cameras can look at a target or be free to follow a path in animation, and the user can modify a number of parameters similar to a real camera. This tutorial explores the basic process of working with cameras.
Two types of camera are available: Target for keeping the camera view fixed on a point wherever the camera is placed and Free for manipulating freely and for use on path animations such as walkthrough movies
This tutorial explains the creation and manipulation of a Target camera. The use of a Free camera is explained in the 'Animation' tutorial when animating a camera along a path. The basic parameters for both types, however, are explained here
Download Sample Data
kf401_files.zip (387kb)
Method 1
from the Create Panel
- Open kf401_01.max This scene contains the completed tutorial landscape model (without materials) plus a couple of lights (hidden) to add brightness for this exercise (lighting is covered later)
- Create Panel > Cameras > Target. The Target button turns orange showing the command is active. The cursor changes to a large cross
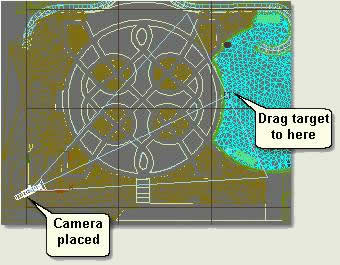
- In the Top viewport left click where you want the camera to be placed then drag (keeping the left finger on the mouse button) to where you want the target to be (ie where the camera will look). Take the left finger off the mouse button to finish the creation process
- Right click to end the command - the Target button turns back to grey
NOTE: In practice just place the camera roughly and then change the position of camera and target afterwards in the Top and Left viewports thus:
- Select Camera 01
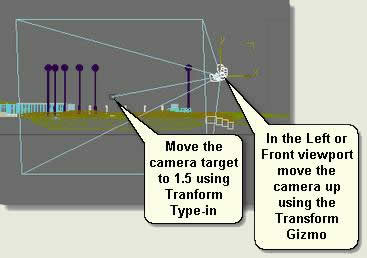
- In the Left viewport move the camera up using the Transform Gizmo
- Select Camera 01.Target and use Move Transform Type-in dialog to move the target to 1.5
TIP: If the camera is to be placed at head height then the target needs to be roughly head height and perhaps down from the camera Z position slightly. The camera can be moved up or down over the site in the knowledge that if placed back at head height the target will be already correctly placed on the Z axis
- Right click in the Front viewport to make it active and type C. This changes the viewport to a Camera viewport
- Change the viewport display to Smooth + Highlights
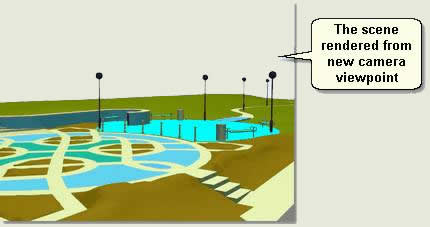
- In the Top viewport move the camera around and view the camera view in the Camera viewport
- Practice moving the camera and target independently in the Top viewport to gain many views and changing the height of the camera in the Left viewport
Method 2
from the Perspective viewport
- Make the User viewport active and type P this changes the viewport to a Perspective viewport
- Move around the scene in the Perspective viewport (selecting a central object and Arc Rotating for efficiency) until the desired view is achieved
- Use the Zoom and Field of View navigation tools
- Views > Create Camera from View. This creates a new camera called Camera 02. This is a Free Camera which does not have a target
- Right click in the Camera 01 viewport and type F and make the display wireframe. This makes the viewport Front viewport and making the display wireframe keeps the display efficient
- Make the Camera viewport active
- Right click viewport menu > Views. Select Camera 01 to change the view to Camera 01
- Rename the cameras to 'view' names such as 'Towards steps from building' so that you can recognise the cameras in future
TIP: Instead of creating new cameras every time, perhaps clone them and rename. Then much of the positioning of the camera and target (especially on the Z axis) is already done. Keep one viewport as Camera viewport and change the views when needed. Use cameras to keep a tight hold on what you actually need to model and in what detail. Use cameras sooner rather than later for efficient viewing and modelling
Camera Parameters
- Select the free camera created from the Perspective viewport
- Modify Panel > Parameters > FOV. Move the Field of View up and down and notice the effect in the viewports
- Use the Stock Lenses buttons to change the field of view quickly
NOTE: The Field of View also changes the Lens value. This relates the field of view to standard camera settings. A standard person's field of view is equivalent to a 35mm lens
- Under Type change the camera to a Target camera. This puts a target on the camera
- Move the camera around in the Top viewport to see the view moving around the Target
NOTE: Many more advanced settings exist for cameras such as clipping planes and Multi-Pass effects for scene depth and atmosphere. These are not covered by Key Fundamentals
Donate to CADTutor
If you found this tutorial useful, you might like to consider making a donation. All content on this site is provided free of charge and we hope to keep it that way. However, running a site like CADTutor does cost money and you can help to improve the service and to guarantee its future by donating a small amount. We guess that you probably wouldn't miss $5.00 but it would make all the difference to us.
Local Navigation
Sponsored Links
The Basics
- Dual Dimensions in a Dim…
- UCSICON Options
- "Best of" Basics: Irreg…
- Tool Palette Basics
- Original Dimension Value
- Possible Solutions to th…
- Avoid Using 'Standard' i…
- Shorten the Plot Scales…
- Update the Source File B…
- User Increment Angles fo…
- Drawing Information
- 'Sign Language'
- Rotate with the Copy Opt…
- Use the INSERT Osnap on…
- To or From the Current L…


